If you’ve not been living under a rock, you’ll know that Facebook groups are going strong in the social world. Brands are actively utilizing groups to stay connected with their audience and build a dynamic community.
But why Groups? That’s because compared to pay-per-click ads, which can cost $200–$600 on average, Facebook Groups allow you to foster engagement without spending much money on a regular basis.
And as a result, Facebook Groups are thriving. According to Meta, most users belong to 15 or more groups, with 100 million new group joins happening daily. This proves that people crave connection and community, making groups a powerful tool for brands to connect with their audience.
In this blog, I’ll explore why communities are a must-have for businesses, how to create a Facebook group, and actionable tips for managing your community like a pro.
Ready to grow your brand with a loyal community? Let’s get started!
Starting a Facebook Group helps brands build a loyal community of followers, foster deeper connections with their audience, and create a space for meaningful engagement. It’s an effective way to turn customers into advocates and encourage organic conversations around your brand.
To put it simply – creating private groups on Facebook gives your audience a spot to interact, share experiences, and feel like they’re part of something special.
And if starting a Facebook group isn’t on your SEO vision board yet, let me change your mind!
Here’s a snapshot showing how HubSpot, Zapier, and Shopify have changed the game by driving bottom-funnel traffic from their community pages!

So basically, a Facebook group as a community for your brand is a win-win for multiple teams: Marketing, SEO, Sales, & Customer Success.
Now, why Facebook? Well, everyone’s already there. With over 2.11 billion daily active users, there’s a good chance your ideal customers are scrolling their feeds right now.
Plus, Facebook Groups feel natural. Your audience doesn’t have to download another app (like Discord or Slack) or figure out a new platform. They already know how it works. It’s like inviting them to a space they’re comfortable in, but this time, it’s all about them and your brand.
If you’re looking to create a sense of belonging for your customers—and honestly, who isn’t? —a Facebook Group might just be the perfect move.
Facebook Groups are easy to set up, and the platform’s tools—like polls, live videos, and member insights—make it super simple to keep the conversation going. (more on that in the blog further)
Honestly, creating a Facebook group will be one of the easiest things you can do for your brand! Here are the steps to follow:
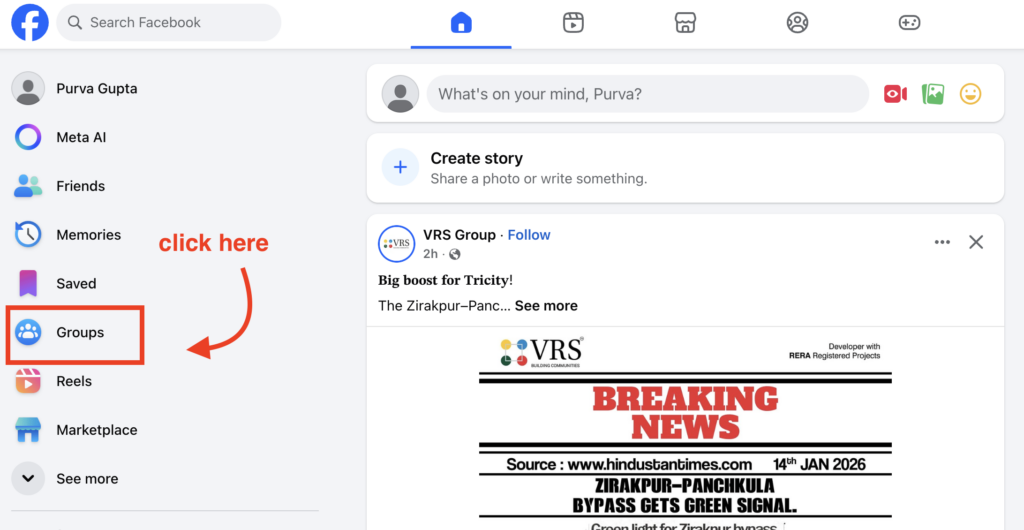
Start by heading to Facebook’s homepage. On the left-hand menu (or the “Menu” tab if you’re on mobile), you’ll see the “Groups” option.
Click on it, and you’ll find a button that says “Create New Group.”
Give your group a name that reflects its purpose or resonates with your audience. Something catchy and clear works best!
For now: I’ll name my group “A Sample Facebook Group.”
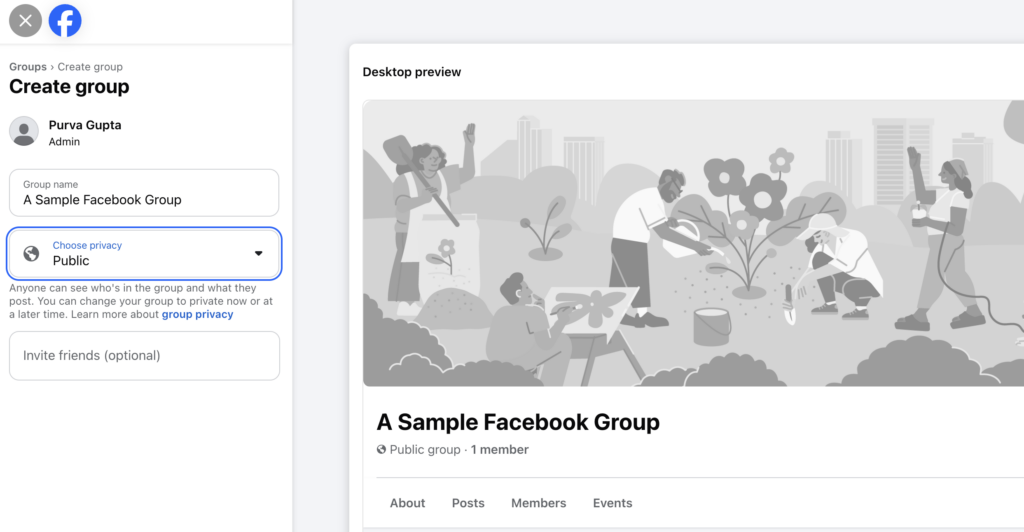
Next, decide on the group’s privacy setting. Facebook offers three main types of groups, and the choice depends on the kind of community you want to build:
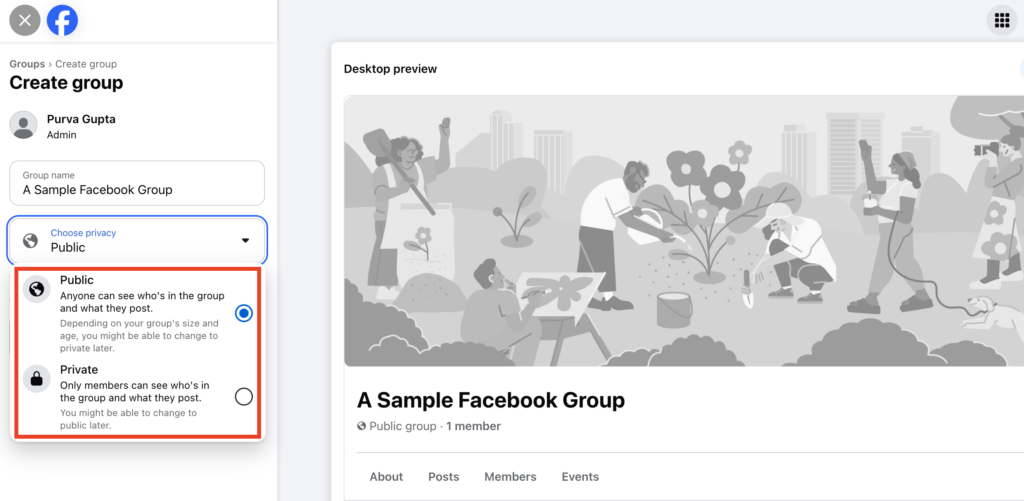
When selecting a privacy setting, think about your audience.
Are you building an inclusive community to grow your brand’s visibility? Create a public Facebook group.
Want to foster a more intimate space for deeper conversations? Create a private Facebook group.
Invite people who you think will benefit from or contribute to the group. You can start by adding your team members, loyal customers, or even your email list.
Also, personalize your group with a cover photo and description. This helps set the tone for the community and lets members know what to expect.
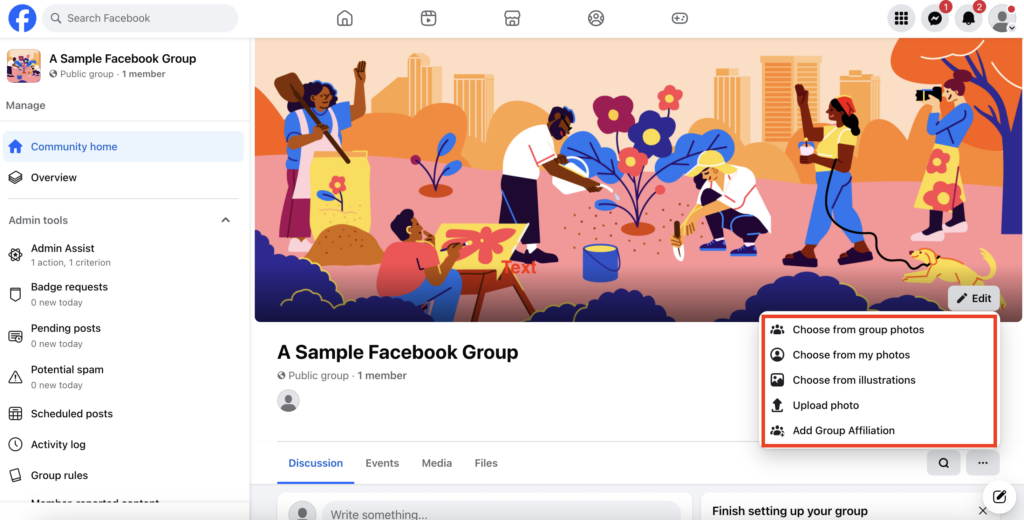
PS: You can click on “Add Group Affiliation” to mark yourself as the group admin.
It will ensure your profile image and name will appear right below the cover picture!
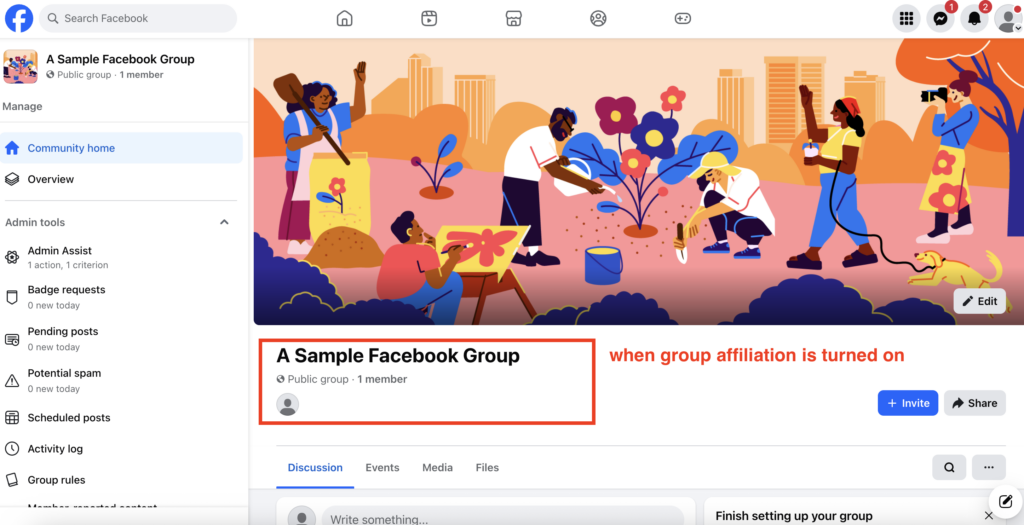
Every great community needs boundaries! Use the group settings to create rules that encourage healthy discussions and keep things on track.
Facebook even offers templates to make this easier.
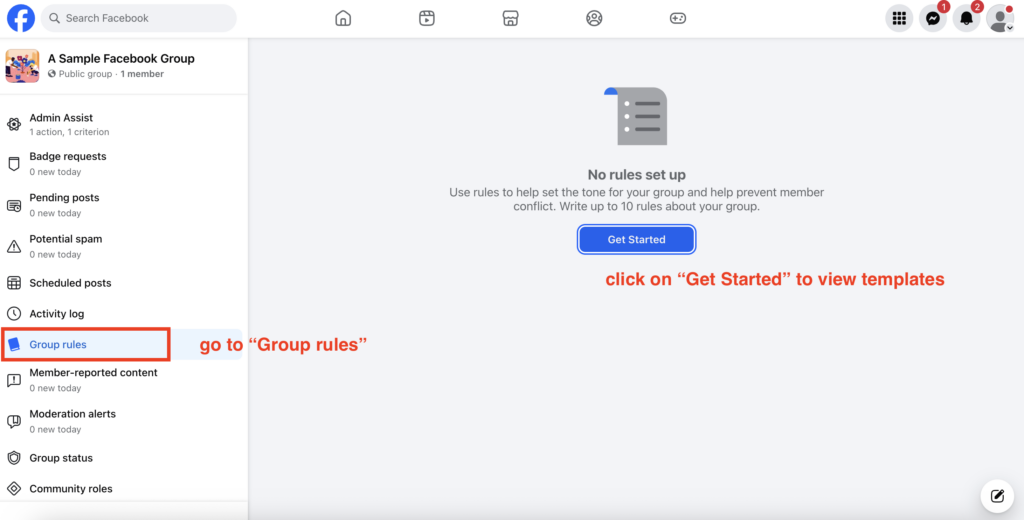
Voila! Your Facebook group is ready for you to start posting.
Share an introduction post, ask engaging questions, or share valuable content to initiate conversations.
And yes, don’t forget to interact with your members—it’s basically why you have opted to create a Facebook group instead of a Facebook page.
A lot of people create a group from their personal profile… and later realize they want it tied to their business. If you want your group to look like an official brand community (and not “just another admin-run group”), create a Page-linked group.
Also, quick clarity: you can’t literally “turn a Facebook Page into a group” with a one-click conversion. What you can do is create a group from your Page (or link an existing group to it) so they work together like one unit.
This happens more often than you think. When you switch profiles, you will land on the exact profile page as admin. Instead, you need to navigate to homepage first. That’s where the “Groups” option will show up.
It is quite possible that you’re already managing a Facebook group and you now want to link it to your brand page profile. While the process might seem a little complicated, here’s how you’re going to do it:
Step 1: First, you need to join the group from your page profile. (If the group is public, you can search the group name or use the group url to join it. If the group is private, send an invite!)
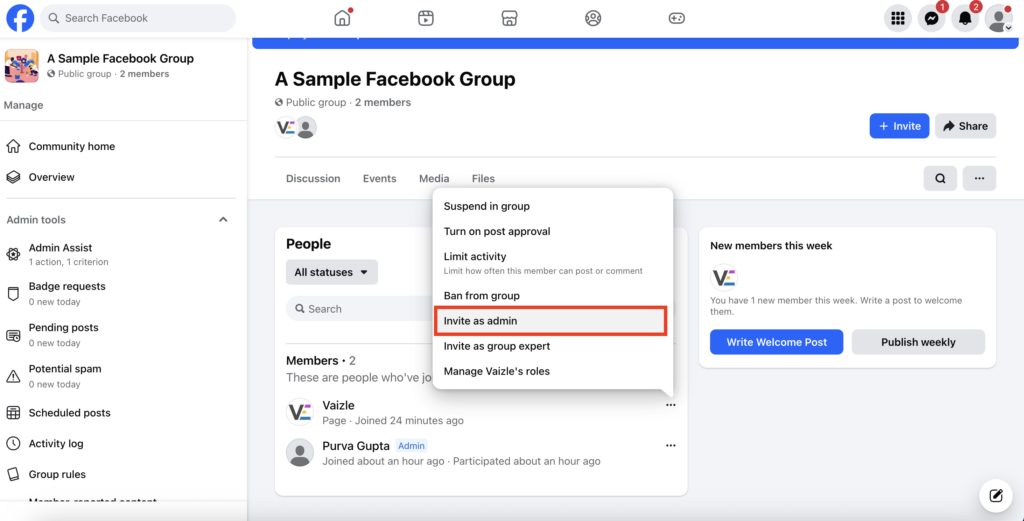
Step 2: When the page profile is added as a group member, add it as an admin. Click on 3 dots next to the page name in the members list. Click on “Invite as Admin.”
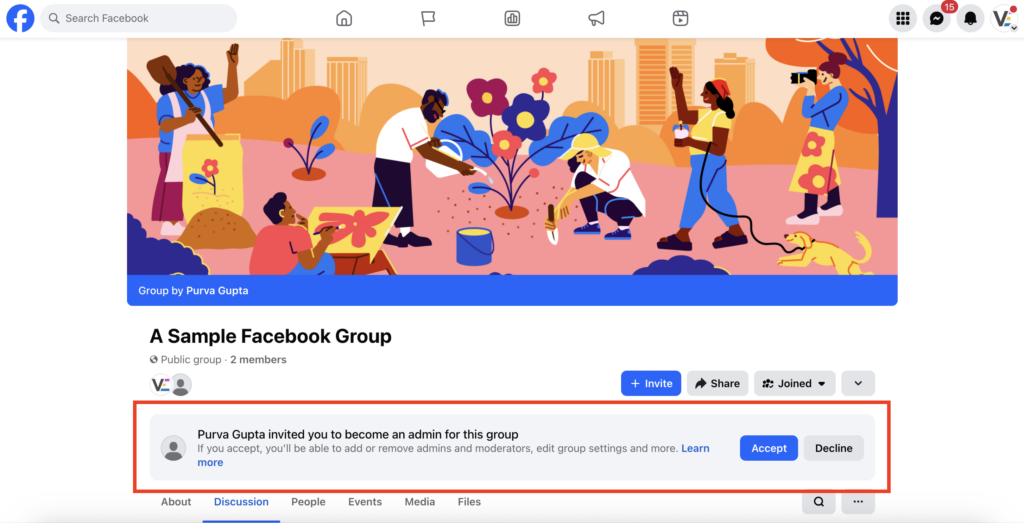
Step 3: Switch back to page profile and accept the admin invitation.
Step 4: Click on your page profile link from top right corner. Now, click on 3 dots below the cover page section. Here, you need to click on “Add Action Button.”
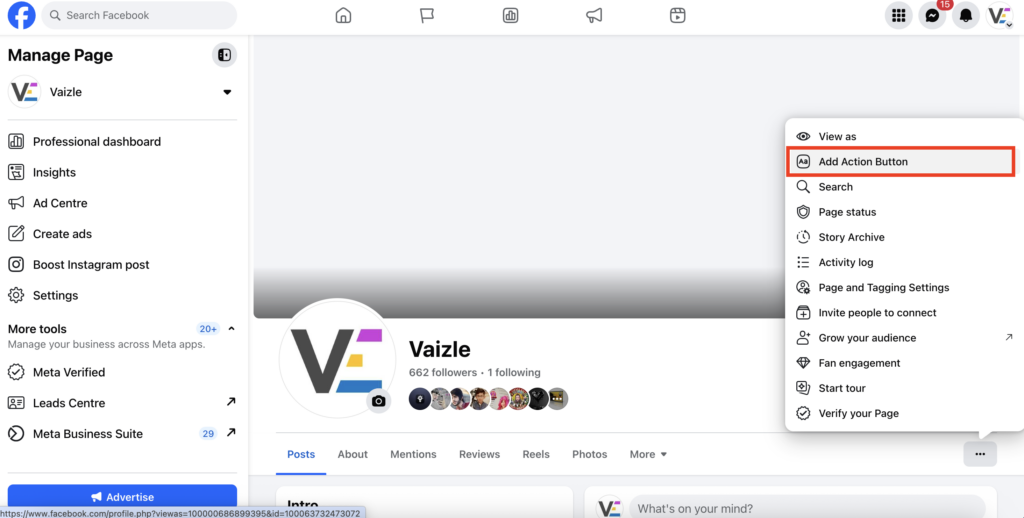
Step 5: From Action button menu, click on “Visit Group” option. Here, you will be able to add the group that will be visible to all your followers.
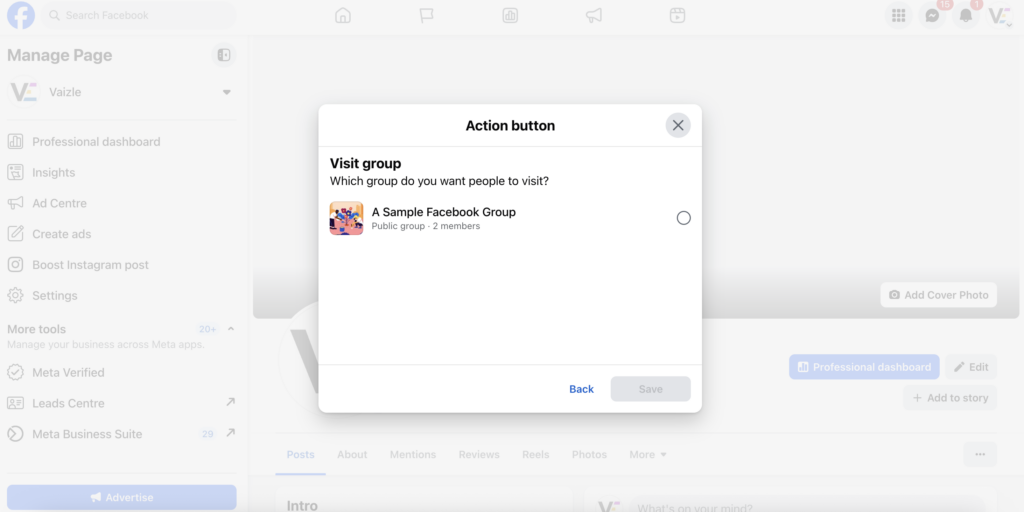
And that’s it.. your existing Facebook group is now linked to your page profile. (PS: In the new interface, some people might see this option directly under the “Groups” tab as link existing existing group.)
Just like we created a group in the above section, creating private groups on Facebook is an easy task. Simply follow these steps:
Log in to your Facebook account and navigate to the Groups section. You can find it in the left menu on the homepage or through the search bar. Click on “Create New Group.”
Pick a name that reflects the purpose of your group. Make it relevant and easy to identify for your target audience.
During the setup, you’ll see an option to choose the group’s privacy settings. Select “Private” to ensure only group members can see posts, events, and discussions. You can also decide whether to edit group settings to make the group hidden or visible to non-members.
Add friends or other individuals who you want to be part of your group. You can manually send invitations or share the group’s link.
Once the group is created, personalize it by adding a cover photo, writing a group description, and setting rules for member behaviour.
Engage with your members by sharing posts, polls, and updates. Encourage discussions to keep the group active.
Now that your FB group is created, you might want to know what the basic Facebook group settings are to focus on!
If you’re wondering how can I control who joins my Facebook group, you can set up a proper membership approval process to take control of who joins the community.
Facebook lets you automatically approve all membership requests or manually review each one.
You can also enable auto-approve members from a certain age demographic, location, or another group. Moreover, you can setup membership questions – a powerful screening tool that asks potential members 1-3 questions before they can join. These questions might include:
For a public group, you will first need to turn on “Participation Approval.” Go to Group Settings, scroll down to Participation Approval and turn it on. You will now see an option to create Participation Questions.
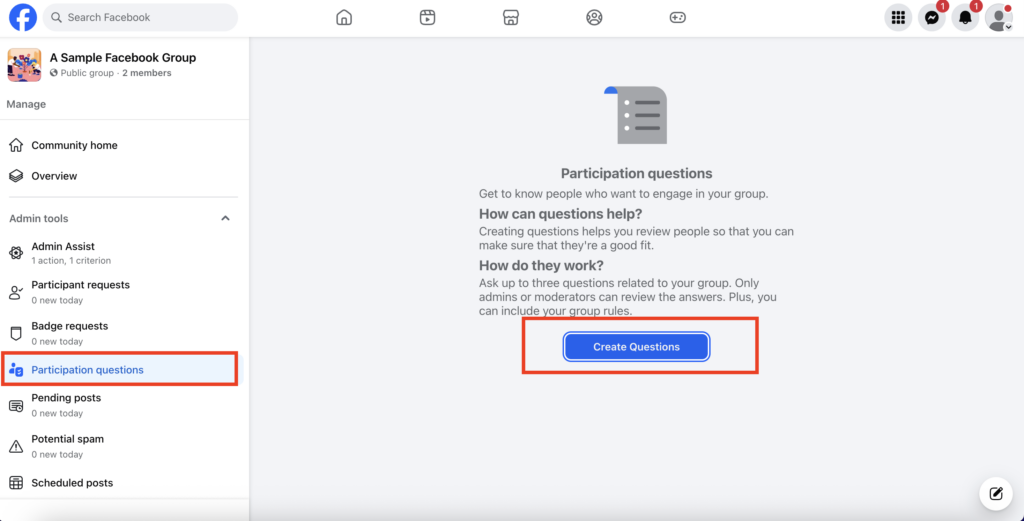
After you create a group on Facebook, also define who can post and what type of content is allowed. You can:
If this is the first time you are forming a Facebook group for your brand’s community, start with stricter posting permissions and gradually relax them as your community culture develops.
You can do this from the “Manage Discussions” section in your Facebook Group settings.
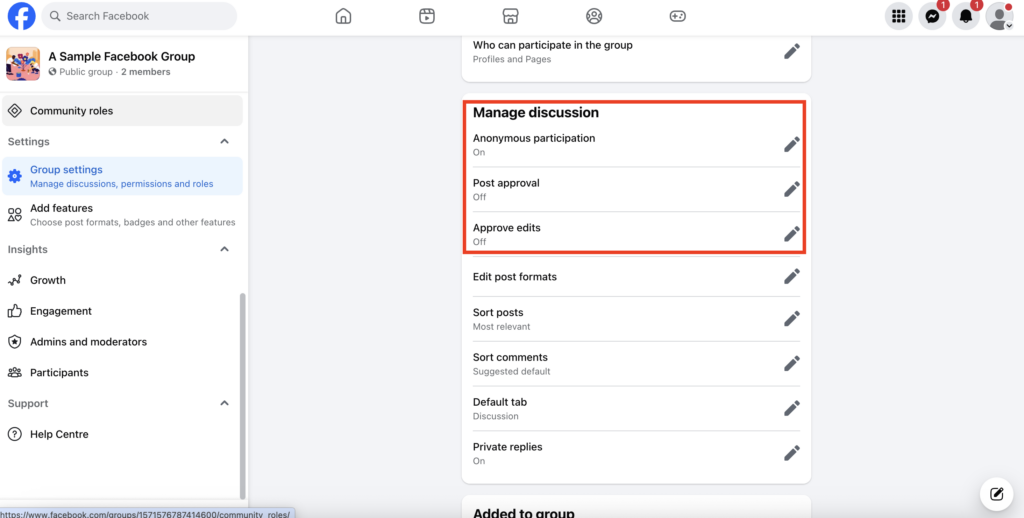
Protect your group’s quality by setting up automatic content filters. Facebook offers several moderation tools:
To moderate content in a Facebook group, simply head to the ‘Admin Assist’ tab. Here, you will be able to manage posts by setting keyword and profanity filters. You can block posts with certain keywords, website links, email addresses, and so on.
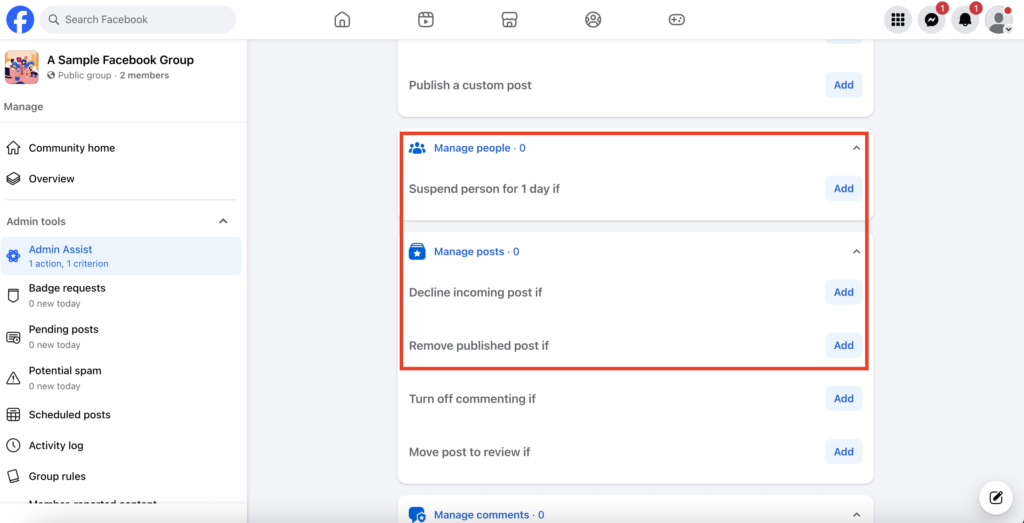
Once your group starts growing, moderation can quickly feel like a full-time job. For that, you have Admin Assist. It will handle repetitive moderation, so you can focus on actually engaging with people.
Here are a few tried-and-tested rule ideas you can set up in minutes:
1. Stop spam before it ever reaches the feed
Create a rule that holds posts for review if the member joined the group less than 30 days ago and their post contains a link or more than one image. It’s a simple filter that weeds out promo bots instantly.
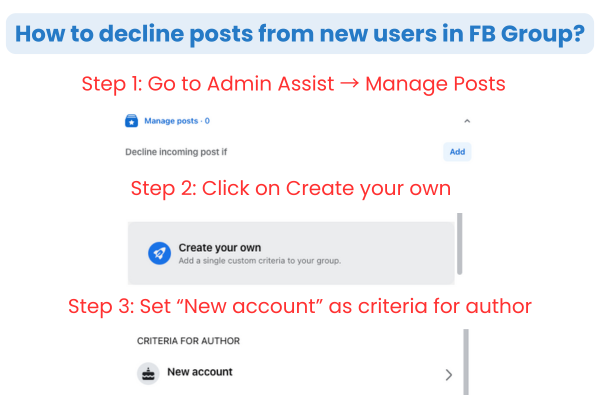
2. Reward people who play by the rules
You can automatically approve posts from members who’ve answered all entry questions and agreed to group rules. That way, the regulars don’t have to wait hours for their posts to appear, and you build a small sense of trust.
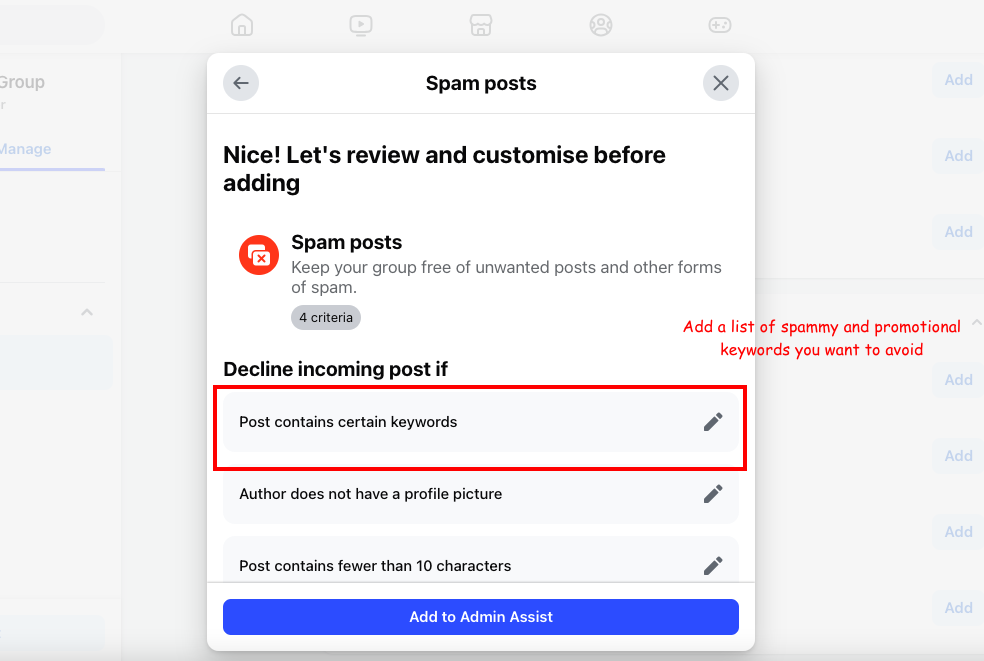
3. Block keyword chaos
Got words that trigger drama or spam? Add them to a “banned words” list and set Admin Assist to decline posts that include those phrases. (You’d be surprised how peaceful your feed feels after this one.)
4. Keep it clean after hours
If you run a business group or community that’s active around certain hours, create a rule to pause new posts overnight. Posts still queue up, but nothing goes live until you’re back. This gives both you and your members a breather.
Pro tip: Review these rules every few months. As your group vibe changes, your automations should evolve too.
If you’ve made it this far in the blog, you’re probably all set with your own Facebook group. You now know how you can create a group on Facebook and how to configure its settings.
But now, let’s talk about the actual hard part. The part that will require day-to-day efforts from your team, i.e., how to build a Facebook Group community.
Your group’s foundation starts with clarity. From the moment someone joins, they should know what the group is about and how to participate. Create a pinned welcome post or guide that outlines:
Example: Check how this Facebook Group admin has added a detailed About Section and pinned posts to keep members informed about the community’s purpose. This structure keeps discussions focused and valuable.

You can also add a ‘Welcome Post’ that will mention all the new members of the Facebook group and give them a much-needed nudge to engage.
For your reference, a welcome post looks something like this:
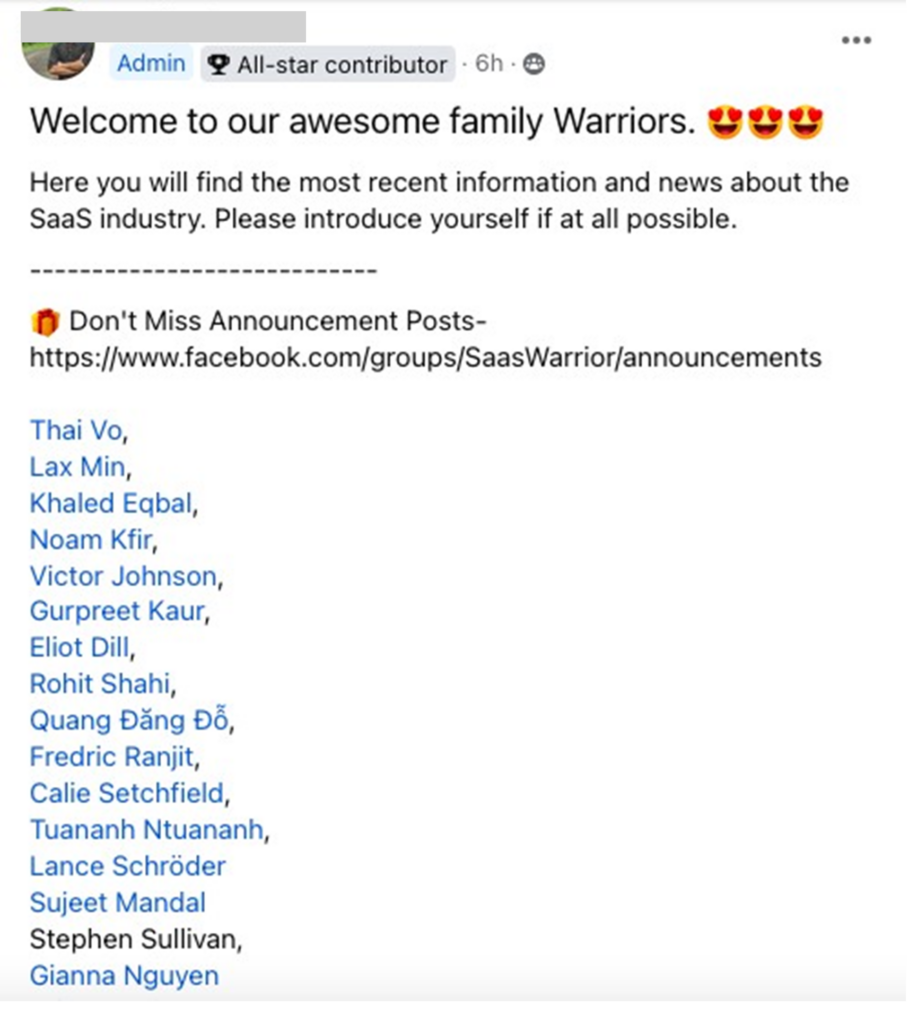
To add a welcome post, simply navigate to the “Admin Assist” section.
Here, find the ‘Publish a welcome post’ button and click ‘Add.’
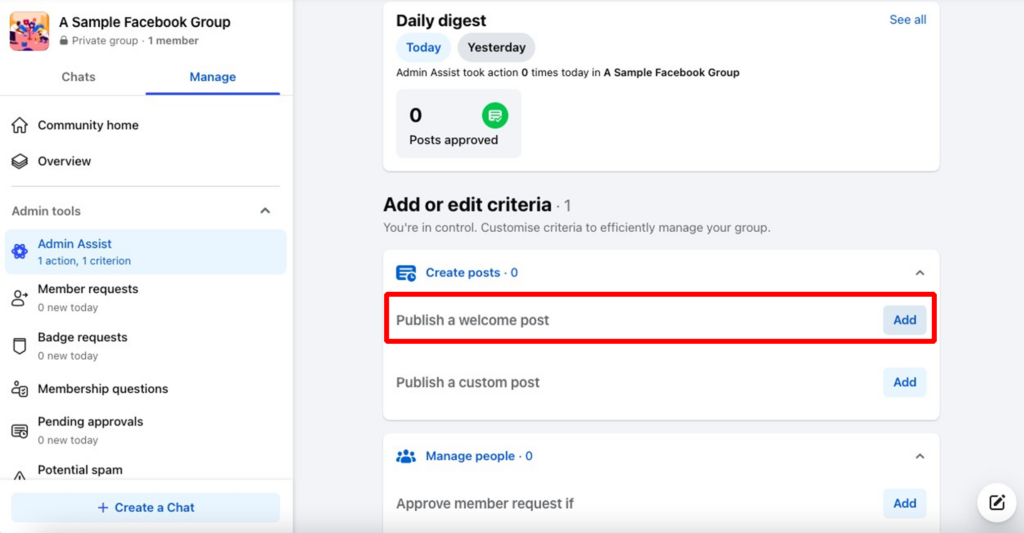
Now, you will be able to choose whether you want to publish a welcome post on a repeating schedule or after specific number of joins.
Facebook offers features like polls, events, and live videos—use them to keep your group dynamic.
Example: Check out this social media community by Socialinsider that often includes engaging posts like these:

Creating a poll in a Facebook group is easy. Simply go to your community home page and click on the ‘Poll’ button.

Now, add the description text and add options to the poll.

Here, you can also toggle the options to allow users to:
If you want to add and manage more features to the Facebook group, simply head to the “Group Settings” tab.
Here, scroll down to find the “Added to group” section and toggle the features you want to add to your Facebook group homepage.

Your most engaged members are your group’s backbone. Highlight their contributions to show appreciation and inspire others.
Example: Check this “All Star Contributor” tag in a Facebook group specifically made for Book Recommendations. This is also a great way to motivate new users to actively contribute to the group.
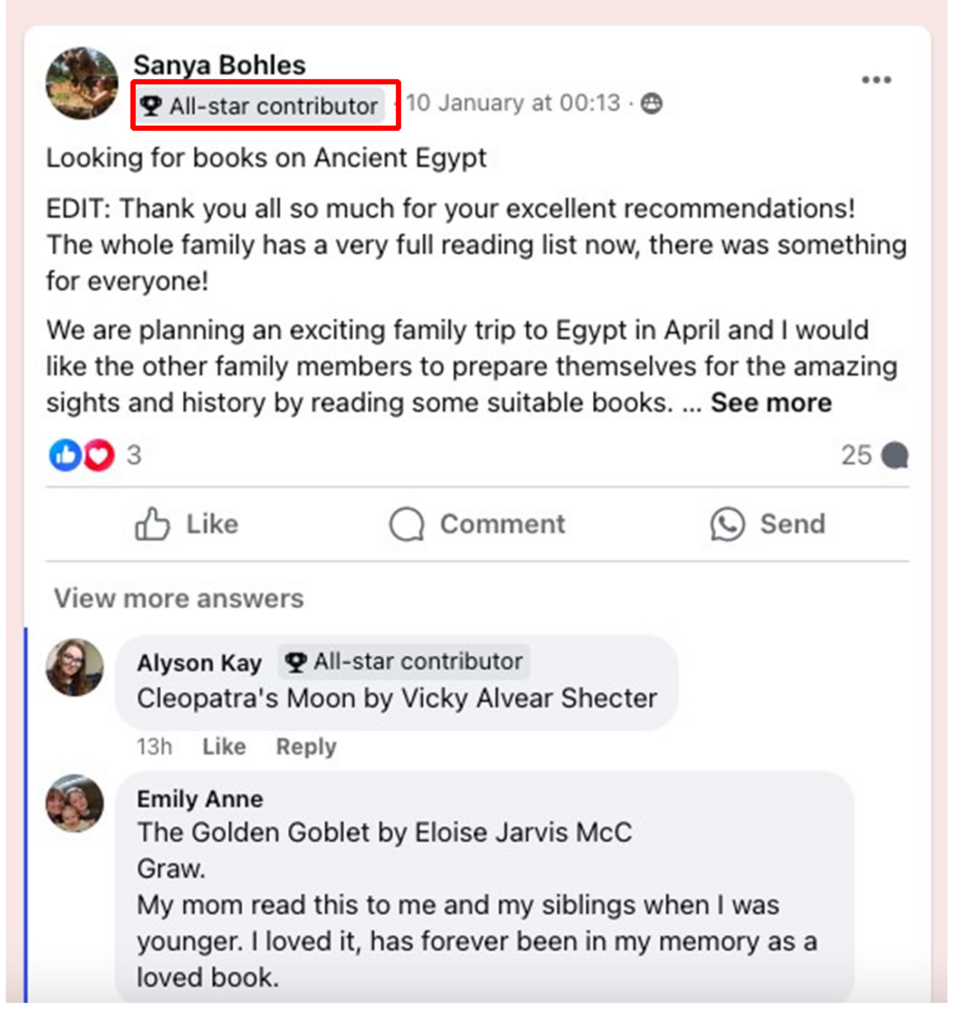
To add and manage badges in a Facebook group, follow these steps:
Now, simply toggle the badges you want to add.

A well-managed group feels safe and inclusive without stifling creativity. Focus on creating boundaries that allow for free expression while keeping the group aligned with its goals.
Example: The “Women in Marketing” group enforces clear guidelines about respectful communication and has moderators actively remove inappropriate posts. This keeps the group professional while fostering open conversations.

To use Group Rules on Facebook, follow these simple steps:
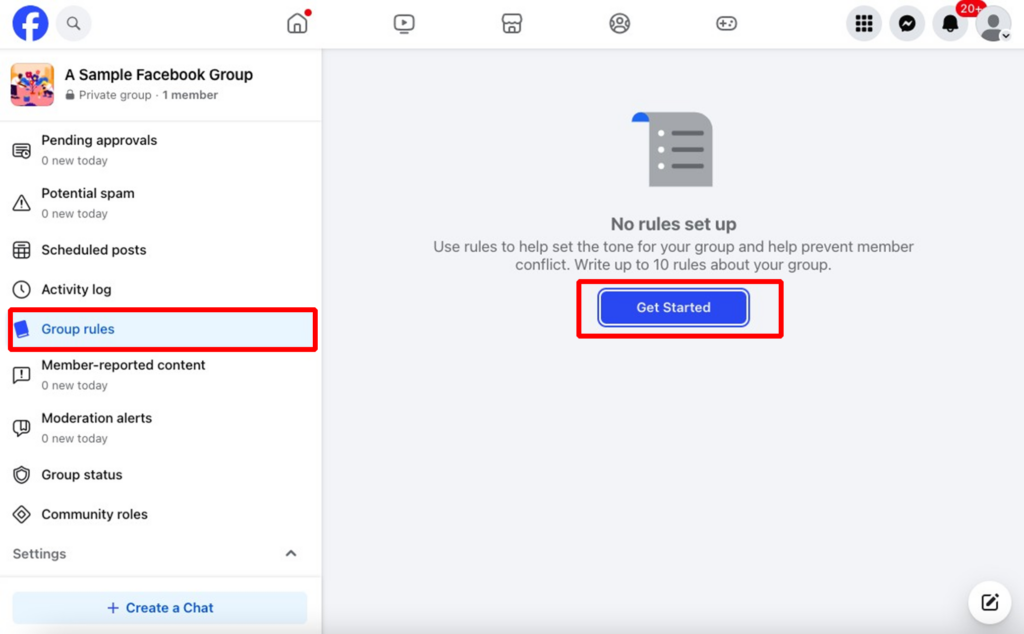
For starters, you will get a list of example rules to add!

Use Facebook Group Insights to analyze what’s going on in the community! With Insights, you will be able to track:
Use these insights to adjust your posting schedule, content strategy, and group goals.
PS: You can further use these insights in your social media report as well. Here are the steps to create a social media report for your teammates or clients.
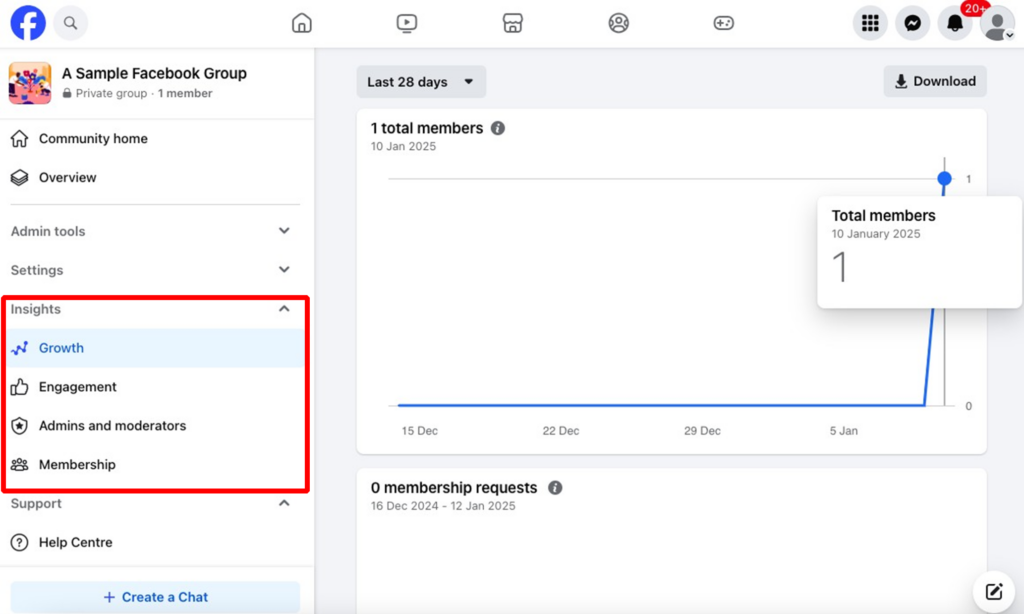
Example: The “Side Hustle Nation” group noticed that Q&A threads performed best on weekday evenings. By scheduling posts during these hours, they boosted engagement and built stronger connections with their audience.
PS: If you have are creating a Facebook Group from scratch and building a small community, you won’t see much for insights in initial days. But that’s completely alright. In first 90 days, watch these metrics:
Once your group has a real pulse (people posting, commenting, asking questions), monetization becomes less “salesy” and more like a natural next step.
Meta has experimented with subscription groups to help admins earn directly, and they’ve acknowledged that many admins already run a separate subscribers-only group alongside a free group, using external tools to track and collect payments.
Keep one group free. Add one paid layer.
That paid layer can be:
While you focus on Facebook Group Insights, also keep a check on your Facebook Page Analytics. Vaizle makes it easy to save time & understand complex data. Try the free Facebook Page Analysis tool now!
While creating a Facebook Group, you can have multiple motives. But there’s one thing in common. Most of them will require users to join the group, gradually engage, show interest, and become customers. That’s a Facebook Group funnel in place. It is the path a stranger takes to become a regular, and later, someone who trusts you enough to try what you offer.
This small funnel isn’t some complicated diagram. It is a series of small steps that repeat and feel natural: discovery, joining, saying something for the first time, coming back again, and choosing a next step when they are ready. Let’s have a look:
For your Facebook Group, choose a name and description that promise one clear outcome and keep them honest. If you ask for email in the join questions, make it optional and explain what you will send and how often. People respond to clarity more than clever tricks.
PS: To pick the right name for your group, you can try our free Team Name Generator! It can whip up some amazing and unique ideas within seconds.
Like said before, welcome threads work because they lower the effort. Tag new members once a week, invite one simple story or opinion, and point them to a short pinned FAQ with your three most useful posts. Newcomers want a safe first step. Give them one.
Groups feel alive when there is a rhythm. Pick one small ritual you can keep even on busy weeks. It could be a theme day, a quick midweek poll, or a Friday spotlight for a helpful comment. When people can guess what happens next, they come back without a reminder.
When replies are steady and tone feels right, invite members to something useful. A weekly email with one practical tip. A short webinar that answers a narrow question. A free tool they can try without a long setup. Say what they will get and how often. If you sync join answers into any system, ask for explicit permission and state it plainly.
Look for momentum rather than vanity metrics. Active members as a percentage of total. Comments per active member. Join rate over the last two weeks. The post types that actually pull replies. If conversations slow, lower the bar with an easier prompt. If joins stall, tighten the description and share one strong post outside the group to bring in fresh eyes.
So, if you’re wondering, how to run a successful Facebook Group, that is the funnel in practice. Make it easy to join, easy to speak once, and easy to return. The rest follows when the room feels alive.
Building a successful Facebook Group is more than just hitting “create.” It’s about cultivating a community where people feel seen, heard, and valued, ultimately fostering a great sense of community. From leveraging Facebook’s unique tools to implementing smart management strategies, there’s so much you can do to create a space your members love to be a part of.
Whether you’re using polls to boost engagement, moderating posts to maintain quality, or hosting live sessions that spark conversations, the possibilities are endless. A well-managed Facebook Group isn’t just a community—it’s an extension of your brand that fosters trust, loyalty, and genuine connections.
So, what’s stopping you? Now that you know how to crete a Facebook group, start building your community today and watch how it transforms the way you engage with your audience. And remember, it’s not just about creating a group—it’s about creating a space where your community thrives.
A Facebook Page represents a brand or public figure and is designed for one-way communication with followers. A Facebook Group is a community space where members can interact, share ideas, and participate in discussions. Pages are public, while groups can be private.
Yes, creating and managing a Facebook Group is completely free. However, you may choose to spend on ads or tools to promote or manage your group.
No, Facebook does not offer an option to directly convert a group into a page. You would need to manually create a page and invite your group members to follow it.
To delete a Facebook Group, remove all members from the group, including yourself. Once no members remain, the group will be deleted automatically. Note that this action is permanent.
Yes, you can earn through Facebook Groups by selling products, offering paid memberships, running ads, or using it as a platform to promote your services. Monetization depends on your group’s purpose and engagement.
On mobile, the usual path is Menu → Groups → + (plus) → Create.
If the plus icon isn’t showing:
Update the Facebook app
Switch back to your personal profile (some Page views hide creation options)
Try desktop: Groups → Create new group
Check if your account has temporary restrictions (Facebook sometimes blocks actions when it detects unusual activity)
Facebook introduced channels/community-chat style spaces for communities, but community chats in Facebook Groups were no longer available effective October 5, 2025.
For real-time conversations now, Messenger/WhatsApp community features are the safer bet.
Arushi is a proficient SEO and ASO specialist with a 5-year track record working for B2B and B2C organizations. Currently, she is heading SEO strategy for Vaizle and helping businesses improve their online presence. A mountain girl at heart, she likes to recharge her creative abilities by taking long walks and listening to podcasts.
Copyright @VAIZLE 2026