Most advertisers check tracking only after performance starts looking wrong.
ROAS drops or maybe purchases don’t match Shopify. Leads show up in your CRM but not in Meta dashboard. The campaign stays in learning. Then someone finally opens Events Manager and asks the real question: is Meta even receiving the right conversion signals?
That is why Meta Pixel and Conversions API setup should happen before you touch budgets, audiences, or creative testing. If your tracking is broken, Meta is not only reporting poorly. It is optimizing with incomplete data.
This guide shows you how to set up the Meta Pixel, connect Conversions API, choose the right events, verify your setup, and fix the most common tracking problems before they quietly waste your ad budget.
👉 Related: How to choose the right Facebook Ads objective because your objective only works properly when Meta can track the event you are optimizing for.
What is the Meta Pixel and what does it actually do?
The Meta Pixel is a small piece of JavaScript code that you install on your website. It helps Meta understand what people do after they visit your site, such as viewing a product, adding something to cart, submitting a form, or completing a purchase. Meta’s own help center explains that the Pixel can track website actions, build audiences, and help optimize campaigns.
In simple words, the Pixel connects your website activity with your Meta ad account.
When someone clicks your ad and lands on your website, the Pixel can send Meta an event. An event is just a tracked action.
Common Meta Pixel events include:
| Event | What it means |
|---|---|
| PageView | Someone visited a page |
| ViewContent | Someone viewed a product, service, or key page |
| AddToCart | Someone added something to cart |
| InitiateCheckout | Someone started checkout |
| Purchase | Someone completed a purchase |
| Lead | Someone submitted a form or became a lead |
| CompleteRegistration | Someone signed up or created an account |
| Search | Someone used search on your website |
Meta uses these events for three major things.
First, it uses events to report what happened after someone clicked or viewed your ad. Second, it uses events to build audiences, such as people who added to cart but did not purchase. Third, it uses events to optimize delivery toward people who are more likely to complete your goal.
That third point is the real reason tracking matters.
Now, here’s the important part: A broken Pixel is not just a reporting issue. It can also become an optimization issue. If Meta cannot see purchases, leads, or checkout activity properly, it has less signal to understand who should see your ads next.
A simple flow looks like this:
User sees ad → clicks ad → lands on website → Pixel fires event → Meta receives event → delivery system gets more signal
If the event does not fire, Meta loses that signal.
Pixel, dataset, and Conversions API: what is the difference?
Before setup, you need to understand three terms you may see inside Events Manager: Pixel, dataset, and Conversions API.
The Pixel tracks browser-side website activity. A dataset is where Meta collects event data from different sources, such as the Pixel, Conversions API, app events, offline events, and messaging events. Meta describes datasets as a way to connect and manage event data from multiple sources inside Events Manager.
Conversions API, often called CAPI, sends event data from your server, ecommerce platform, CRM, or tag server directly to Meta. Meta describes Conversions API as a way to create a direct connection between your marketing data and Meta’s systems.
Here is the simple version:
| Term | What it means |
|---|---|
| Meta Pixel | Browser-side tracking code on your website |
| Dataset | The place where Meta collects event data |
| Conversions API | Server-side connection that sends events to Meta |
| Events Manager | The place where you set up, test, and monitor events |
You may still hear people say “Facebook Pixel,” “Meta Pixel,” “Pixel ID,” or “dataset.” In many day-to-day conversations, they are talking about the same tracking setup.
The important thing is not the label. The important thing is whether Meta is receiving the right events from the right places.

Meta Pixel vs Conversions API: which one do you need?
You need both Meta Pixel and Conversions API.
The Meta Pixel sends events from the browser. Conversions API sends events from your server or platform.
Pixel is easier to install, but browser-side tracking can be affected by browser restrictions, cookie limits, ad blockers, and privacy settings. CAPI helps fill some of those signal gaps by sending events directly from a server or platform connection.
Here is the practical comparison:
| Meta Pixel | Conversions API | |
|---|---|---|
| Where it runs | Browser | Server, platform, CRM, or tag server |
| Tracking type | Client-side | Server-side |
| Setup difficulty | Easy | Moderate |
| Affected by browser restrictions | More likely | Less likely |
| Captures on-site behavior | Yes | Yes, when configured |
| Best use | Website activity tracking | Stronger conversion signal |
| Should you use it alone? | No | Usually no |
Pixel and CAPI are not enemies. They are two parts of the same tracking stack.
The Pixel is useful because it captures browser activity and user actions on the website. CAPI is useful because it sends a more reliable server-side signal.
For most advertisers in 2026, Pixel-only tracking is too weak. CAPI-only tracking can also miss important browser-side context if it is not configured well.
The stronger setup is Pixel plus CAPI.
Will Pixel and CAPI double-count conversions?
Not when deduplication is set up correctly.
When the same event is sent from both Pixel and CAPI, Meta can deduplicate it. That means Meta understands that both signals refer to the same action.
The key is the event ID.
For example, if a customer completes one purchase, your browser Pixel may send a Purchase event and your server may send a Purchase event through CAPI. To avoid double-counting, both events should share the same event ID. Meta’s developer documentation explains that browser and server events should use matching event IDs for deduplication.
Bad setup:
| Source | Event | Event ID |
|---|---|---|
| Pixel | Purchase | 123 |
| CAPI | Purchase | 789 |
Good setup:
| Source | Event | Event ID |
|---|---|---|
| Pixel | Purchase | 123 |
| CAPI | Purchase | 123 |
If deduplication is wrong, your data can become inflated. Meta may show more purchases than actually happened. If events are missing, your data can become underreported. Meta may show fewer purchases than your backend or ecommerce store.
Both are bad. Clean tracking is not just about “more data.” It is about accurate data.
👉 Related: Check out our guide explaining why your Meta and Shopify sales might not be matching.
What is Event Match Quality?
Event Match Quality tells you how well Meta can match your events to real Meta accounts.
If Meta receives a Purchase event but does not have enough information to connect that event with a person, the signal becomes weaker. If Meta receives the event along with useful customer information, such as hashed email, phone number, external ID, browser ID, or click ID, the match quality improves.
Meta says advanced matching can help improve ad performance by sending hashed customer information from your website.
This matters because Meta does not just need to know that a conversion happened. It also needs enough signal to understand who converted, so it can find more people with similar behavior.
Low Event Match Quality does not always mean your event is broken. But it usually means the event is not giving Meta enough useful information.
For most advertisers, the first priority should be improving the match quality of the most valuable event.
- For ecommerce, that is usually Purchase.
- For lead generation, that is usually Lead.
- For SaaS, it may be CompleteRegistration, StartTrial, Purchase, or a custom activation event.
Before you install Meta Pixel or CAPI, go through this checklist
Do this before setting up the Pixel or CAPI. It saves time and avoids half-finished setups.
| You need access to | Why it matters |
|---|---|
| Meta Business Manager | To manage business assets and permissions |
| Meta Events Manager | To create, connect, and test event data |
| Ad account | To connect tracking with campaigns |
| Website admin or platform admin | To install Pixel or partner integration |
| Shopify, WooCommerce, Webflow, WordPress, or CMS access | To connect platform-level tracking |
| Google Tag Manager access, if used | To install and manage tags |
| Test purchase or test lead flow | To confirm events fire correctly |
| Meta Pixel Helper Chrome extension | To check browser-side Pixel events |
Do not start setup if nobody has website access.
Many tracking projects get stuck because the marketer has Meta access, but no one can edit the website, install an app, or change checkout settings.
How to install the Meta Pixel step by step?
There are three common ways to install the Meta Pixel:
- Partner integration
- Manual installation
- Google Tag Manager
The best method depends on your website setup.
Method 1: Partner integration
Start here if your website runs on Shopify, WooCommerce, Wix, Squarespace, Webflow, or another supported platform.
Partner integrations are usually the easiest path because they reduce manual code work. They can also help connect both Pixel and CAPI, depending on the platform.
For Shopify, use the official Facebook and Instagram by Meta setup inside Shopify. Shopify’s documentation explains that merchants can add a Meta Pixel and choose customer data-sharing settings for the online store.
For WooCommerce, use the official Meta for WooCommerce plugin. WooCommerce’s documentation says the extension supports Pixel and Conversions API, and also notes that events sent through Pixel and CAPI can be deduplicated using a unique event ID.
Partner integration is usually best when:
| Use partner integration if… | Avoid relying only on it if… |
|---|---|
| You use Shopify or WooCommerce | You have a custom checkout |
| You want the fastest setup | You need custom event logic |
| You do not have a developer | Your funnel spans multiple domains |
| You want lower maintenance | You need backend-specific events |
Even with a partner integration, you must verify the setup.
Do not assume it works because the app says “connected.”
Method 2: Manual installation
Manual installation means copying the Pixel base code from Meta and adding it to your website’s <head> section.
Use this method if you have direct website access or a developer can add the code for you.
The basic process is:
- Open Meta Events Manager.
- Choose your dataset or create a new data source.
- Select web as the source.
- Follow the Meta Pixel setup steps.
- Copy the Pixel base code.
- Paste it inside the
<head>tag on every page of your website. - Add standard events to the correct pages or actions.
- Test everything in Events Manager and Pixel Helper.
The base Pixel code usually tracks PageView. That is useful, but it is not enough.
This is the most common mistake in Facebook Pixel setup.
Someone installs the base code, sees activity in Events Manager, and assumes tracking is done. But PageView only tells Meta that someone visited a page. It does not tell Meta that someone purchased, became a lead, added to cart, or completed registration.
For campaign optimization, your important events must fire at the right moments.
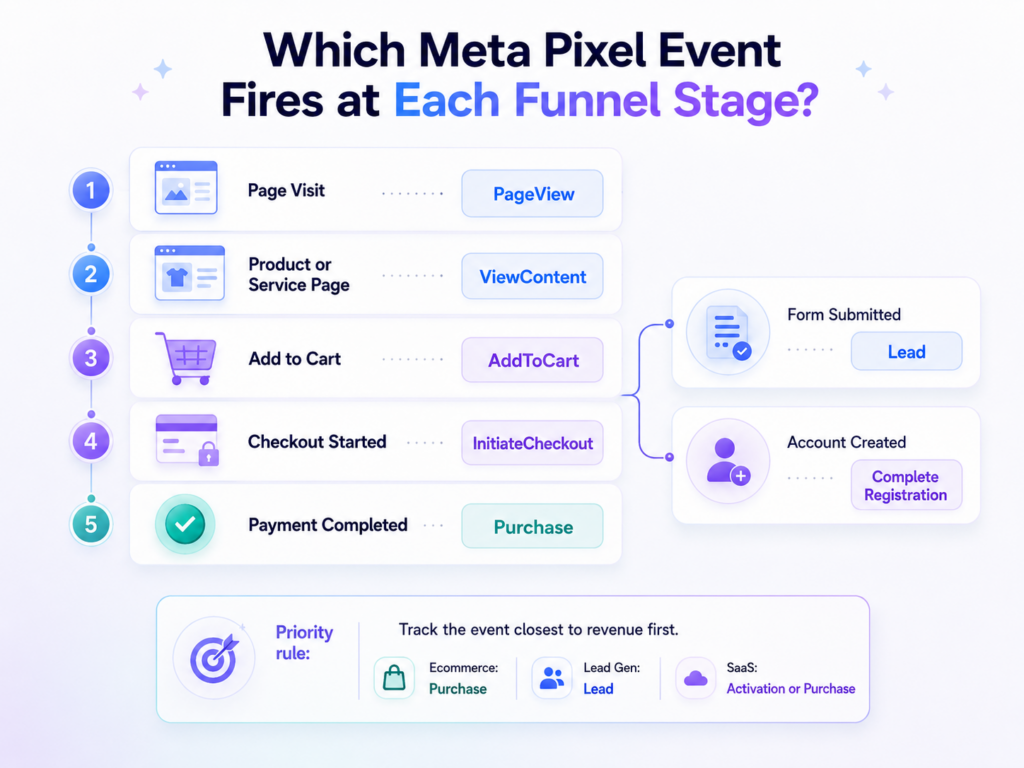
| Funnel moment | Event to fire |
|---|---|
| Product or service page view | ViewContent |
| Add to cart click | AddToCart |
| Checkout start | InitiateCheckout |
| Completed order | Purchase |
| Submitted lead form | Lead |
| Created account | CompleteRegistration |
If you only install PageView, Meta can build traffic audiences, but it does not get the conversion signal your campaigns need.
Method 3: Google Tag Manager
Google Tag Manager is useful when your team already uses GTM to manage marketing tags.
In this setup, you add Meta Pixel through GTM and control when events fire using triggers.
Use GTM if:
| Good fit | Not a good fit |
|---|---|
| Your website already has GTM installed | You have never used GTM before |
| You manage many marketing tags | You only need a basic Shopify setup |
| You need better trigger control | Nobody can QA tags properly |
| Your team understands events and triggers | You need a quick no-code setup |
GTM gives you flexibility, but it also creates room for mistakes.
A common mistake is firing Purchase when the checkout page loads instead of when the order confirmation page loads. Another mistake is firing AddToCart on every product page view.
GTM is only useful when triggers are clean.
Which Meta Pixel events should you install?
Do not install every event just because it exists. Install the events that map to your funnel.
For most advertisers, these are the important ones:
| Event | Where to fire it | Why it matters |
|---|---|---|
| ViewContent | Product, service, or landing page | Tracks meaningful interest |
| AddToCart | Add-to-cart action or cart page | Tracks mid-funnel intent |
| InitiateCheckout | Checkout start | Tracks high purchase intent |
| Purchase | Order confirmation page | Tracks completed revenue |
| Lead | Thank-you page or successful form submit | Tracks completed lead action |
| CompleteRegistration | Account or signup confirmation | Tracks user registration |
| Search | Site search results page | Tracks product discovery |
| AddPaymentInfo | Payment step | Tracks deeper checkout intent |
Your priority should follow the value of the action. For ecommerce, Purchase is the most important event.
For lead generation, Lead is the most important event.
For SaaS, the most important event may not be the first signup. It may be account activation, trial start, completed onboarding, or paid subscription.
Standard events vs custom events
Use standard events whenever they fit.
Meta already recognizes standard events like Purchase, Lead, AddToCart, InitiateCheckout, and CompleteRegistration. These events are easier to use in campaign optimization, reporting, and audience building.
Meta’s developer documentation lists standard Pixel events and explains that they can be tracked using the Pixel’s fbq('track') function.
Custom events are useful when your funnel has an important action that does not fit a standard event.
Examples:
| Custom event | When it makes sense |
|---|---|
| WatchedDemo | Someone watched your product demo |
| ScheduledCall | Someone booked a sales call |
| CompletedOnboarding | A SaaS user completed onboarding |
| ActivatedAccount | A user reached an important usage milestone |
| ConnectedDataSource | A user connected an account or integration |
The rule is simple: do not track every small click.
Only send events that help you optimize, retarget, report, or understand real funnel progress.
Custom conversions
Custom conversions are useful when you cannot add event code directly.
For example, if every lead goes to a URL like /thank-you, you can create a custom conversion based on that URL.
This is helpful for landing pages, third-party forms, and simple funnels.
But custom conversions should not be your first choice when you control the website. If you can fire a clean standard event, use the standard event.
How to set up Meta Conversions API?
Conversions API sends event data to Meta from a server, platform, CRM, or tag server.
You do not need to build a custom API integration in most cases.
There are four practical setup paths:
- Partner integration
- Conversions API Gateway
- Server-side Google Tag Manager
- Direct API integration
Option 1: Partner integration
This is the best starting point for most ecommerce brands.
If you use Shopify, WooCommerce, or another supported platform, check whether the platform can send server events to Meta automatically.
Shopify’s Meta data-sharing settings mention the Meta Pixel and Facebook Conversions API as tools for tracking orders and collecting event data from your online store.
WooCommerce says the Meta for WooCommerce extension includes Conversions API out of the box.
Use this option if you want the fastest clean setup and your platform supports it.
After setup, go to Events Manager and check whether browser and server events are both arriving. Do not stop at the platform connection screen.
Option 2: Conversions API Gateway
Conversions API Gateway is a lower-code setup path inside Meta’s ecosystem. Meta describes it as a self-serve configuration option in Events Manager that helps businesses set up Conversions API using best-practice guidance.
Use CAPI Gateway if your platform does not give you a clean native integration and you do not want to build a direct API connection.
It is especially useful for teams that want CAPI benefits but do not have developer time for a full custom build.
Use this path if:
| Best for | Why |
|---|---|
| Marketers without developer support | More guided than direct API |
| Non-Shopify websites | Gives another setup route |
| Teams that want server-side signal | Avoids full custom implementation |
| Businesses with simple web funnels | Enough for many standard events |
Still, it needs QA.
You must test events, check deduplication, and confirm that key events are passing the right data.
Option 3: Server-side Google Tag Manager
Server-side GTM gives you more control than a simple plugin.
In this setup, your website sends event data to a server-side GTM container. That server container then sends the event to Meta through Conversions API.
This is a good option for agencies, technical marketers, or brands that already use GTM heavily.
Use it if:
| Good fit | Not a good fit |
|---|---|
| Your team already understands GTM | You are new to GTM |
| You need control over event payloads | You only need a basic setup |
| You manage many tags | Nobody will maintain the server container |
| You have tracking QA process | You need a quick beginner setup |
Server-side GTM is powerful, but it is not magic.
If your web events are messy, server-side GTM can still send messy data.
Option 4: Direct API integration
Direct API integration is the most technical option.
You may need it if you have a custom checkout, headless ecommerce setup, backend SaaS flow, CRM-based conversion process, or offline conversion path.
This setup usually requires a backend developer. It involves access tokens, event payloads, customer information parameters, event IDs, and deduplication logic.
For most marketers, the important point is this:
If Pixel and CAPI both send the same conversion, they should use the same event ID so Meta can deduplicate the event correctly.
How to verify your Pixel and CAPI setup?
Setup means nothing until you test it.
Use four checks:
- Meta Pixel Helper
- Events Manager Test Events
- Diagnostics
- Event Match Quality
Check 1: Meta Pixel Helper
Meta Pixel Helper is a free Chrome extension that helps validate your Pixel implementation. Meta’s developer documentation says it helps verify whether your Pixel is working properly and troubleshoot common errors.
Use it to check browser-side events.
Open your website, click through the funnel, and check what Pixel Helper shows.
Look for:
| What you see | What it means |
|---|---|
| PageView fires | Base Pixel is installed |
| ViewContent fires | Product or landing page tracking works |
| AddToCart fires | Cart intent tracking works |
| Purchase fires | Purchase browser event works |
| Duplicate Pixel warning | Pixel may be installed twice |
| Invalid Pixel ID | Wrong Pixel or dataset ID may be used |
| No event beyond PageView | Standard events are missing |
Pixel Helper is useful, but it does not fully verify server-side CAPI events. For that, use Events Manager.
Check 2: Events Manager Test Events
The Test Events tool helps verify browser and server events inside Events Manager. Meta’s help center says you can open Events Manager, select the data source, click Test Events, and check whether events appear while testing your website.
Do not only test the homepage.
Test the actual funnel.
| Funnel step | Event to check |
|---|---|
| Homepage or landing page | PageView |
| Product or service page | ViewContent |
| Add to cart | AddToCart |
| Checkout start | InitiateCheckout |
| Completed purchase | Purchase |
| Form submission | Lead |
| Account signup | CompleteRegistration |
For Purchase, check three things:
- Does Purchase fire only after a completed order?
- Is value passed?
- Is currency passed?
A Purchase event without value and currency is weak for ecommerce. It may tell Meta that an order happened, but it does not tell Meta how much revenue came from that order.
That affects ROAS analysis and value-based optimization.
👉 Related: Check Facebook Ads benchmarks for 2026!
Check 3: Diagnostics
Events Manager Diagnostics helps you find issues with your event setup.
This is where Meta may flag missing parameters, duplicate events, low-quality event data, or setup issues.
Use Diagnostics before you blame campaign performance.
A simple process:
- Open Events Manager.
- Select your dataset.
- Open Diagnostics.
- Review active warnings.
- Fix the issue with the highest impact first.
- Retest the event.
If Meta says Purchase is missing value, fix that before worrying about smaller events.
If Meta flags duplicate events, fix that before increasing budget.
If Meta flags low match quality, review customer information parameters.
Check 4: Event Match Quality
Event Match Quality shows how well Meta can match your events to Meta accounts.
Meta’s Conversions API best practices explain that matched events can be used for attribution and ad delivery optimization, and that higher matching quality is better.
Low match quality means Meta is receiving the event, but not enough useful matching information.
Common parameters that help include:
| Parameter | Why it helps |
|---|---|
| Strong customer match signal | |
| Phone number | Strong customer match signal |
| External ID | Useful for logged-in users |
| fbp | Browser ID from Meta Pixel |
| fbc | Meta click ID |
| IP address and user agent | Helpful event context |
Start with your highest-value event.
For ecommerce, improve Purchase first.
For lead generation, improve Lead first.
For SaaS, improve the event that best predicts revenue or activation.
Also check whether Automatic Advanced Matching is turned on if it fits your setup. Meta says Automatic Advanced Matching can help improve matching by using customer information entered on your website, and it can be toggled in Events Manager without editing website code in supported cases.
Already running campaigns and wondering whether tracking gaps are affecting performance?
Ask Vaizle AI to audit your Meta Ads conversion data and show where reporting, attribution, or event quality may be misleading your decisions. Start Now>>
What to do if your Meta Pixel is not tracking correctly?
Most Pixel problems come from a small set of setup mistakes.
Here is how to diagnose them by symptom.
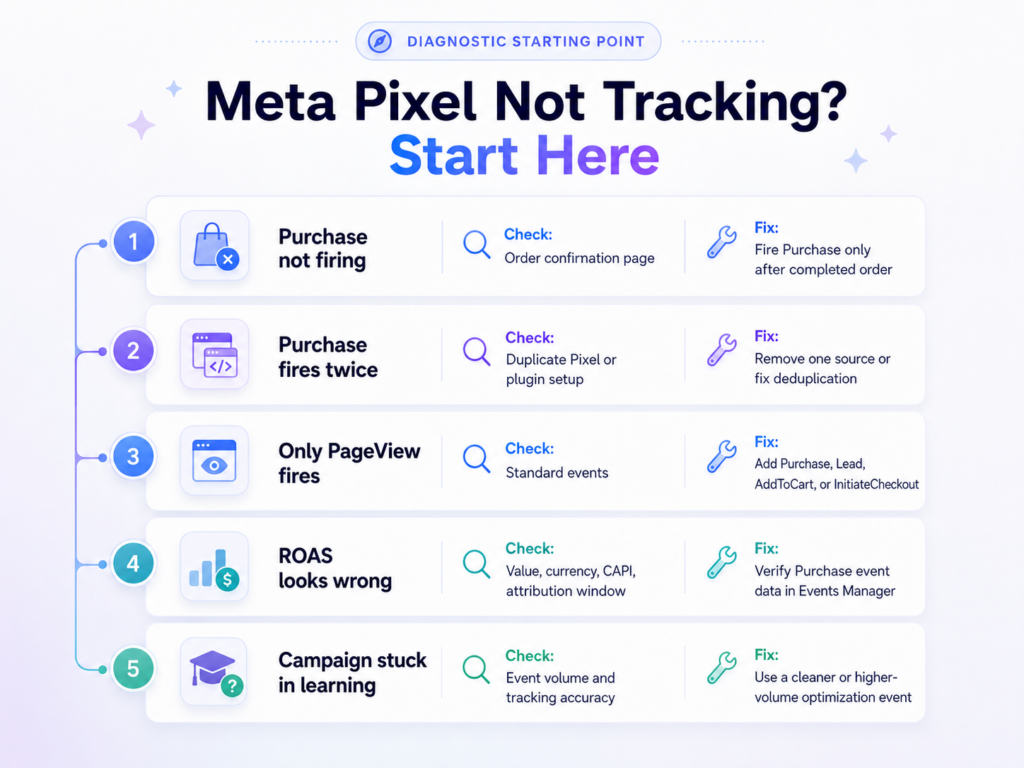
| Symptom | What to check first | Likely fix |
|---|---|---|
| Purchase event not firing | Order confirmation page | Move Purchase to the final confirmation page |
| Purchase fires twice | Duplicate Pixel or failed deduplication | Remove duplicate setup or fix event ID |
| Only PageView fires | Standard events missing | Add Purchase, Lead, AddToCart, or other needed events |
| AddToCart fires on page load | Wrong trigger | Fire it only on add-to-cart action |
| Lead fires before form submit | Event placed on form page | Move Lead to thank-you page or successful submit |
| Shopify sales do not match Meta | Attribution, CAPI, duplicate events, missing events | Compare Events Manager, Shopify, and attribution settings |
| CAPI active but EMQ is low | Missing customer parameters | Add stronger customer information where allowed |
| Meta reports lower ROAS than backend | Missing Purchase value, attribution difference, signal loss | Check Purchase event value and CAPI status |
| Learning phase stuck | Low event volume or broken event | Check event volume and optimization event |
| Pixel Helper works but Events Manager looks empty | Wrong dataset or reporting delay | Confirm dataset and use Test Events |
Problem: Purchase event is not firing
This is one of the most serious issues for ecommerce brands.
Purchase should fire only after a successful order. In most cases, that means the order confirmation page or the platform’s completed order event.
Do not fire Purchase on the product page, cart page, checkout page, or payment page before the order is complete.
If Meta does not receive Purchase events, it cannot properly optimize for buyers.
Problem: Purchase fires twice / Duplicate Purchase events
Duplicate Purchase events can make performance look better than it is.
This usually happens when the Pixel is installed in more than one place. For example, a Shopify store may have the Meta integration active and also have old Pixel code added manually inside the theme.
The result is messy reporting.
Ads Manager may show more purchases than your backend. ROAS may look inflated. A campaign may look scalable when it is not actually profitable.
If your reported purchases are higher than real orders, check duplicate setup first.
scaling, make sure reported purchases are close to actual backend orders.
Problem: ROAS does not match your store
Meta Ads Manager and your ecommerce platform will rarely match perfectly.
That does not always mean tracking is broken.
Differences can happen because of attribution windows, delayed reporting, modeled conversions, refunds, time zones, payment failures, or privacy restrictions.
But you should investigate when the gap is large or sudden.
Check:
- Is Purchase firing?
- Is Purchase firing once per order?
- Is value passed correctly?
- Is currency correct?
- Is CAPI active?
- Are browser and server events deduplicated?
- Are you comparing the same date range and time zone?
- Are you comparing attributed sales with total store sales?
Do not expect perfect matching. Expect explainable differences.
Problem: Meta ads campaign is stuck in learning phase
The learning phase needs enough optimization events.
If your campaign optimizes for Purchase but you only get a few purchases per week, Meta has limited signal. If Purchase tracking is broken, the problem gets worse.
First, check whether Purchase is firing correctly.
If it is firing correctly but volume is too low, you may need to optimize temporarily for a higher-volume event, such as InitiateCheckout, AddToCart, or Lead.
Do not switch events randomly.
Use the event that is closest to business value while still giving Meta enough signal.
Do you still need domain verification and Aggregated Event Measurement?
Domain verification is still good account hygiene.
It helps prove that your business controls the domain and can reduce confusion when managing web events, links, and business assets.
Aggregated Event Measurement is Meta’s protocol for measuring web and app events from people using iOS 14 and later devices. Meta still documents AEM as part of its measurement system.
But the old workflow around manually prioritizing eight web events has changed across many accounts over time. Some advertisers may no longer see the older Aggregated Event Measurement configuration flow in the same way.
So the practical 2026 advice is:
- Verify your domain if you manage campaigns for your own website.
- Check Events Manager for any web event configuration or signal warnings.
- If Meta asks you to prioritize events, put Purchase or Lead first.
- Do not assume every account will show the same old eight-event setup screen.
- Keep your highest-value events clean, tested, and active.
For ecommerce, the top event is usually Purchase.
For lead generation, the top event is usually Lead.
For SaaS, the top event may be Purchase, CompleteRegistration, StartTrial, or a custom activation event.
How to set up tracking based on your business model?
Tracking should match your funnel.
Do not copy another brand’s setup without checking how your own business converts.
Ecommerce tracking setup
For ecommerce, your must-have events are:
| Event | Priority |
|---|---|
| Purchase | Highest |
| InitiateCheckout | High |
| AddToCart | Medium |
| ViewContent | Medium |
| AddPaymentInfo | Useful |
| Search | Useful for larger stores |
Purchase must fire after a completed order.
It should pass value and currency.
This matters because ecommerce ads are not only about order count. A campaign that brings five ₹500 orders is not the same as a campaign that brings five ₹5,000 orders.
If Meta receives purchase value, it can report revenue more accurately and support value-based optimization.
Common ecommerce mistakes:
| Mistake | Why it hurts |
|---|---|
| Purchase fires twice | ROAS looks inflated |
| Purchase has no value | Revenue tracking becomes weak |
| AddToCart fires on page view | Mid-funnel signal becomes polluted |
| CAPI not active | Server-side signal is missing |
| Currency missing or wrong | Revenue reporting becomes unreliable |
Lead generation tracking setup
For lead generation, the most important event is Lead.
Lead should fire only after a successful form submission. It should not fire when someone lands on the form page or clicks into the first field.
A simple lead gen setup:
| Funnel moment | Event |
|---|---|
| Landing page view | ViewContent |
| Successful form submit | Lead |
| Multi-step form completion | CompleteRegistration or custom event |
| Booked call | Custom event, if valuable |
If you use instant forms on Facebook or Instagram, the lead is captured inside Meta. Your website Pixel does not track that form submission because the user may never land on your website.
👉 Related: Check our guide on how to run lead ads on Facebook!
SaaS and subscription tracking setup
SaaS tracking needs a little more thought because the first signup may not be your best signal.
A free trial start may look good in Ads Manager, but it may not predict revenue. If only a small percentage of trial users activate or pay, you may need to track deeper events.
A better SaaS setup may track:
| Funnel moment | Suggested event |
|---|---|
| Pricing page view | ViewContent |
| Free trial start | Lead or StartTrial |
| Account creation | CompleteRegistration |
| Subscription start | Purchase |
| Onboarding completed | Custom event |
| Key activation action | Custom event |
Custom events can be useful for SaaS when they represent real value.
For example, if users who connect an ad account are much more likely to become paid customers, ConnectedDataSource may be a better signal than a basic signup.
But keep the setup focused.
Meta does not need every click inside your product. It needs the events that show meaningful progress toward revenue.
Final tracking checklist before launching any campaign
Use this before launching or scaling Meta Ads.
| Check | Done? |
|---|---|
| Dataset is connected in Events Manager | |
| Meta Pixel base code is installed | |
| PageView fires on key pages | |
| ViewContent fires on product, service, or landing pages | |
| AddToCart fires only on add-to-cart action | |
| InitiateCheckout fires when checkout starts | |
| Purchase fires only after a confirmed order | |
| Lead fires only after successful form submission | |
| Purchase passes value and currency | |
| Pixel Helper shows no duplicate Pixel issue | |
| Test Events confirms browser events | |
| Test Events confirms server events, if using CAPI | |
| Pixel and CAPI deduplication is working | |
| Event Match Quality has been checked | |
| Diagnostics warnings have been reviewed | |
| Domain is verified, where relevant | |
| Highest-value event is clean and active |
This checklist may feel small, but it can protect a lot of ad spend.
If tracking is broken, every other decision becomes weaker. You may pause the wrong ad, scale the wrong campaign, blame the wrong audience, or assume Meta is underperforming when the real issue is that Meta never received clean conversion data.
Conclusion: fix the signal before you judge performance
Meta Ads performance is not only shaped by your budget, creative, targeting, or objective.
It is also shaped by the quality of the signal you send back to Meta.
If the Pixel is missing important events, Meta gets an incomplete view of your funnel. If CAPI is not set up, you may lose server-side conversion signal. If Purchase fires twice, ROAS can look better than reality. If Lead fires too early, Meta may optimize for visitors instead of real prospects.
That is why tracking should be checked before you make big campaign decisions.
Before you increase budget, change objectives, rebuild audiences, or rewrite all your creatives, open Events Manager and make sure Meta is receiving the right data.
Once your tracking is clean, your campaign analysis becomes much more useful. You can look at ROAS, CPA, CTR, conversion rate, and funnel drop-offs with more confidence because you know the numbers are built on better signal.
That is also where Vaizle AI fits naturally into the workflow.
After your Pixel and CAPI setup is working, you can use Vaizle AI to analyze your Meta Ads performance without manually digging through Ads Manager. You can ask questions like:
| Question to ask Vaizle AI | Why it helps |
|---|---|
| Why did my ROAS drop this week? | Checks campaign and conversion patterns |
| Which campaign is wasting spend? | Finds weak performers faster |
| Are my leads getting more expensive? | Spots CPA changes across campaigns |
| Which ads are bringing better purchase intent? | Connects creative performance with funnel behavior |
| What should I check before scaling? | Turns account data into next steps |
Tracking gives Meta the data it needs.
Vaizle AI helps you understand what that data is trying to tell you.
So before you launch your next campaign, make sure your Pixel, CAPI, and key events are working properly. Then set your objective and budget with confidence.